
Learn all basics about DLP 3d printing and use Unionfab’s free 3d printing cost calculator to estimate your model’s printing price.
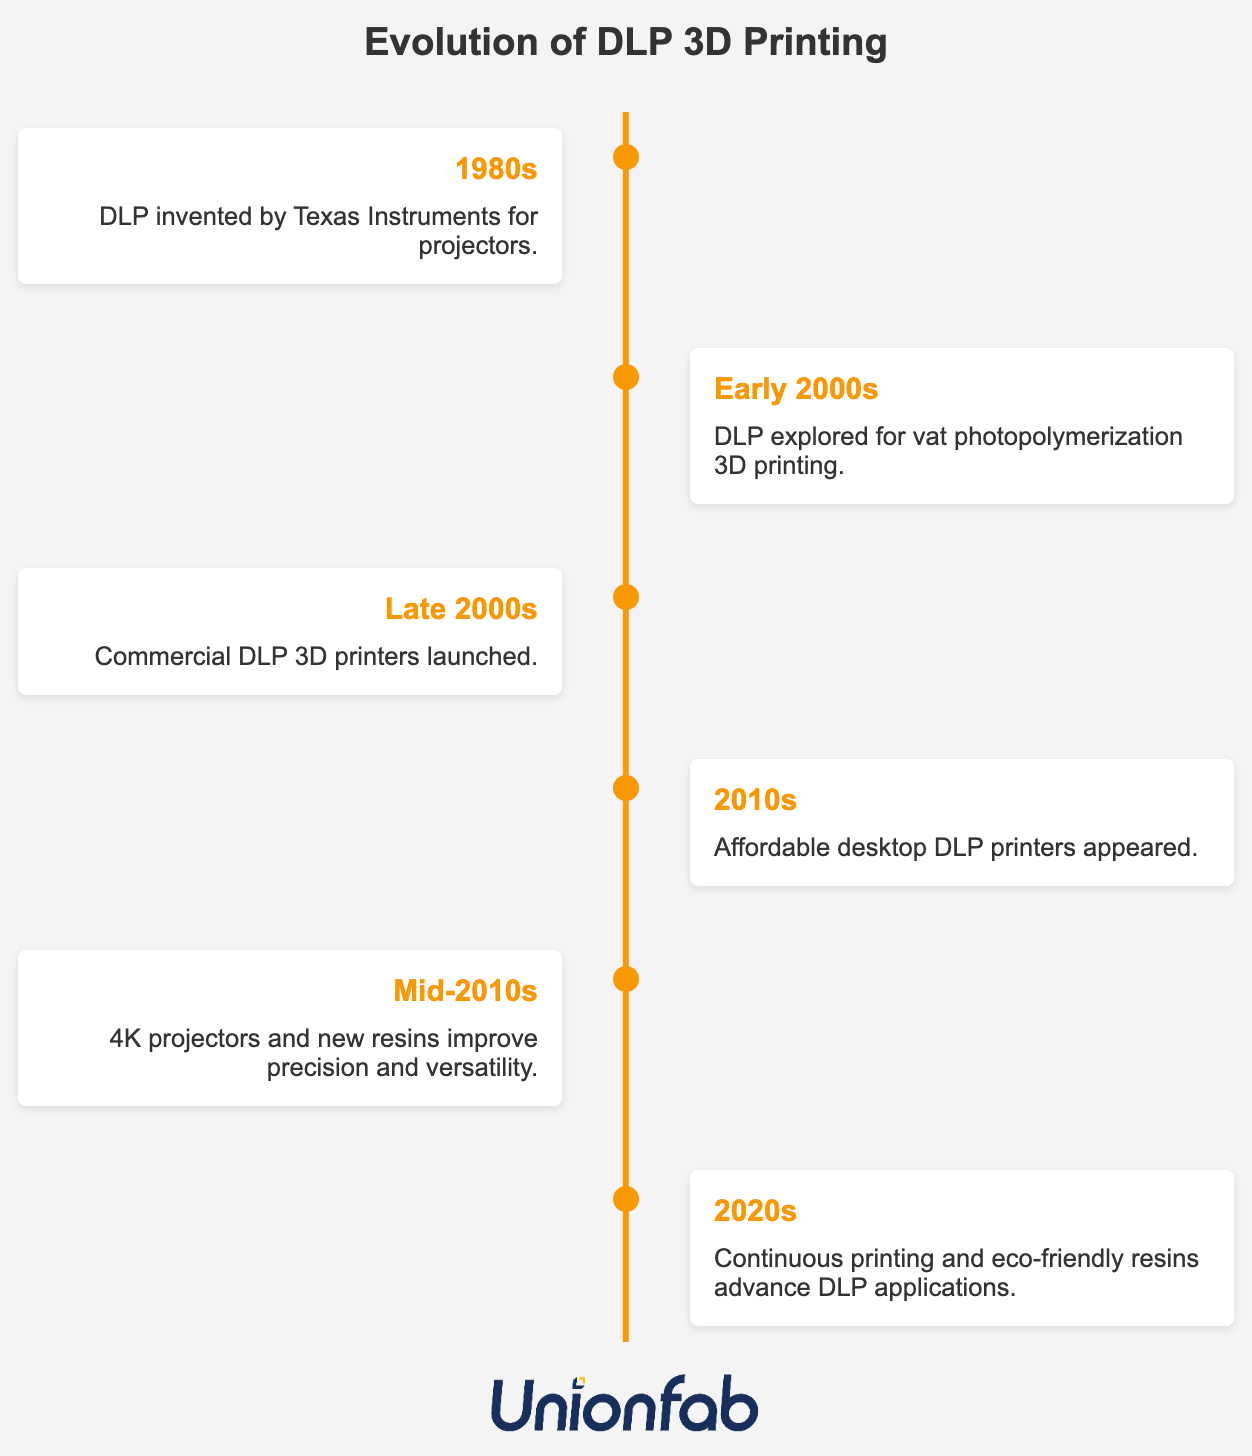
Evolution of DLP 3D Printing
DLP 3D printing, which stems from Digital Light Processing technology, has followed a general timeline of development as outlined below.
-
1980s: DLP technology was developed by Texas Instruments, originally for digital projectors. Its core component, the Digital Micromirror Device (DMD), uses tiny mirrors to control light projection.
-
1990s: DLP became widely used in projectors and display systems, laying the foundation for its precise light control capabilities.
-
Early 2000s: As 3D printing emerged, researchers began exploring DLP for vat photopolymerization. Its layer-wide projection made it ideal for rapidly curing photopolymer resin.
-
Around 2010: DLP 3D printers entered the commercial market, initially used in professional fields like dentistry and jewelry for their high precision and speed.
-
After 2015: With advances in materials and hardware, DLP 3D printing became more affordable and accessible to consumers. Improved resolution expanded its use into medical, industrial, and consumer applications.
-
2020s: DLP continues to evolve, integrating technologies like continuous printing (e.g., CLIP) and new resins. Its applications now include microfluidics and flexible electronics.
Today, known for its exceptional surface quality and fine details (down to 25–50 microns), DLP has become a go-to choice for industries like jewelry, dentistry, and engineering, where accuracy and speed matter.
This guide will help you understand how DLP 3D printing works, its pros & cons, common uses, and how it compares to other resin printing technologies. You’ll also find design tips for better printing quality and use Unionfab’s free online cost calculator to figure out how much it will cost to 3d print your model.
What is DLP 3d printing?
DLP 3D printing, or Digital Light Processing 3D printing, is a technology that uses a digital projector to solidify liquid resin into precise, solid objects layer by layer. Unlike traditional manufacturing, DLP creates parts by projecting light patterns onto a resin surface, hardening it instantly.
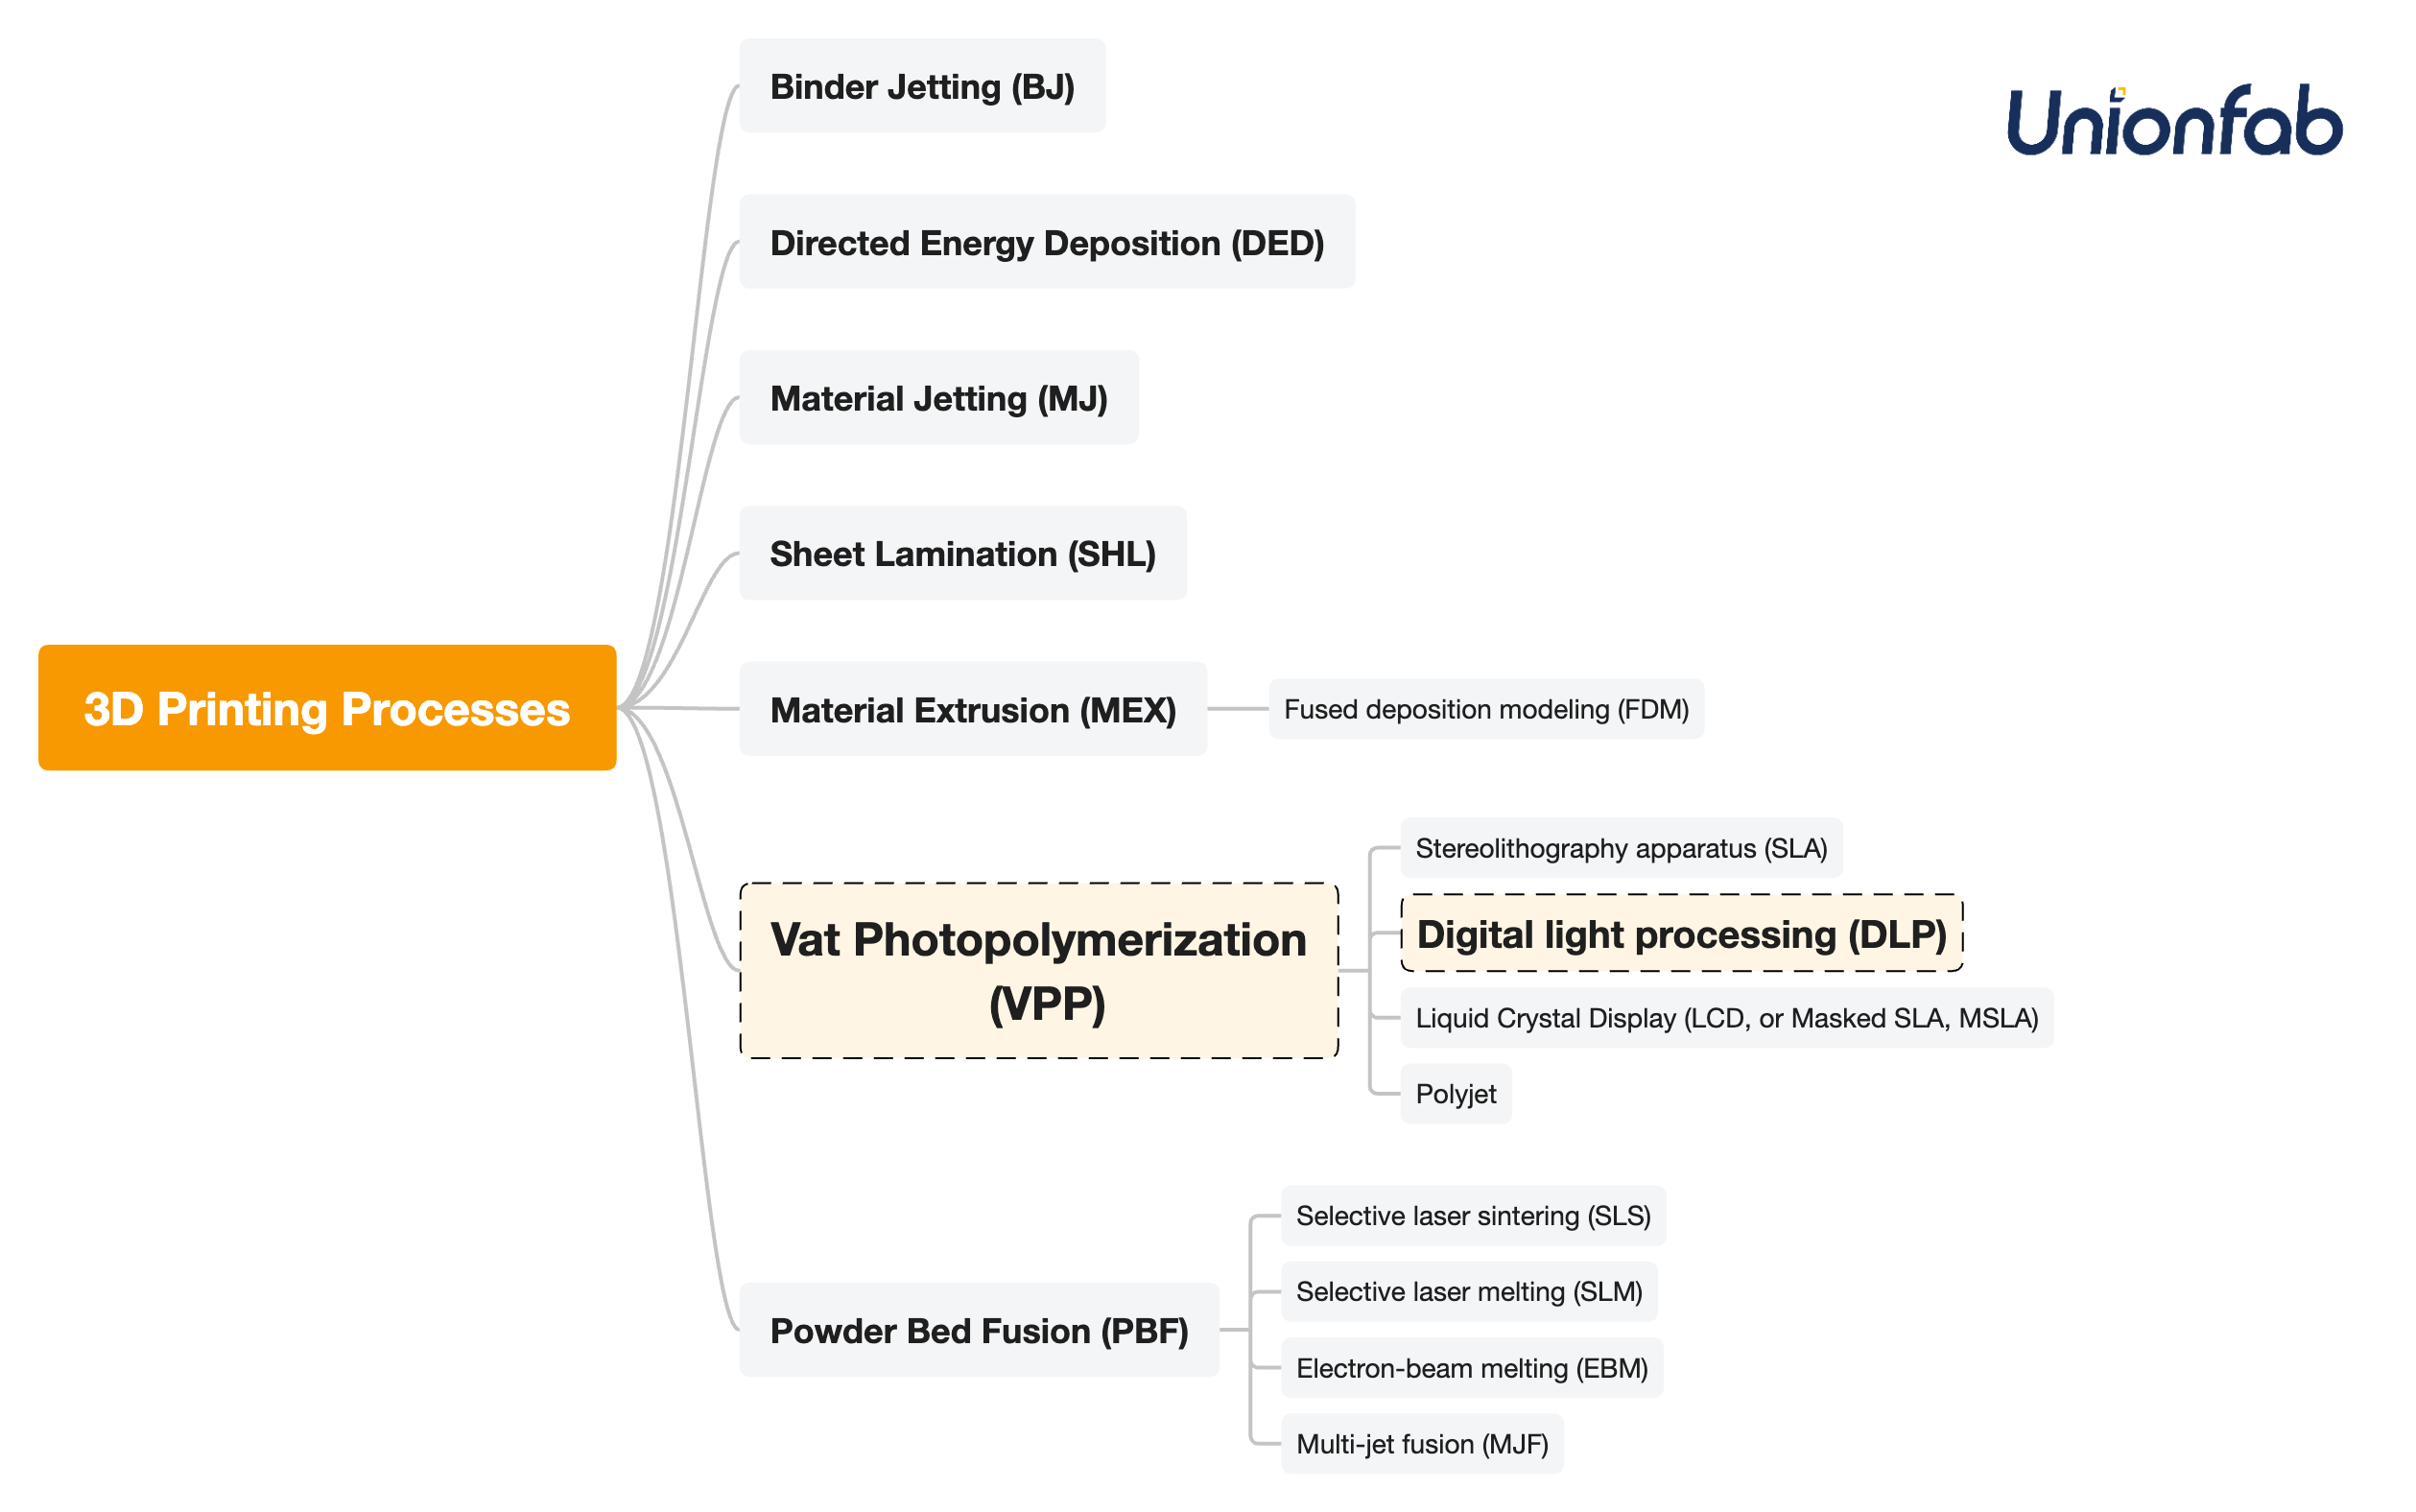
According to the Standard ISO/ASTM 52900:2021, which divides 3d printing into 7 categories, DLP 3d printing belongs to vat photopolymerization, together with SLA, MSLA(LCD) and Polyjet. It has some typical advantages as follows:
-
High Precision: DLP achieves micron-level accuracy, perfect for intricate designs like jewelry or dental models.
-
Fast Printing: Curing entire layers at once makes DLP quicker than SLA’s point-by-point method.
-
Smooth Finishes: Parts have polished surfaces, minimizing post-processing.
-
Efficient for Small Batches: Ideal for low-volume production without costly molds.
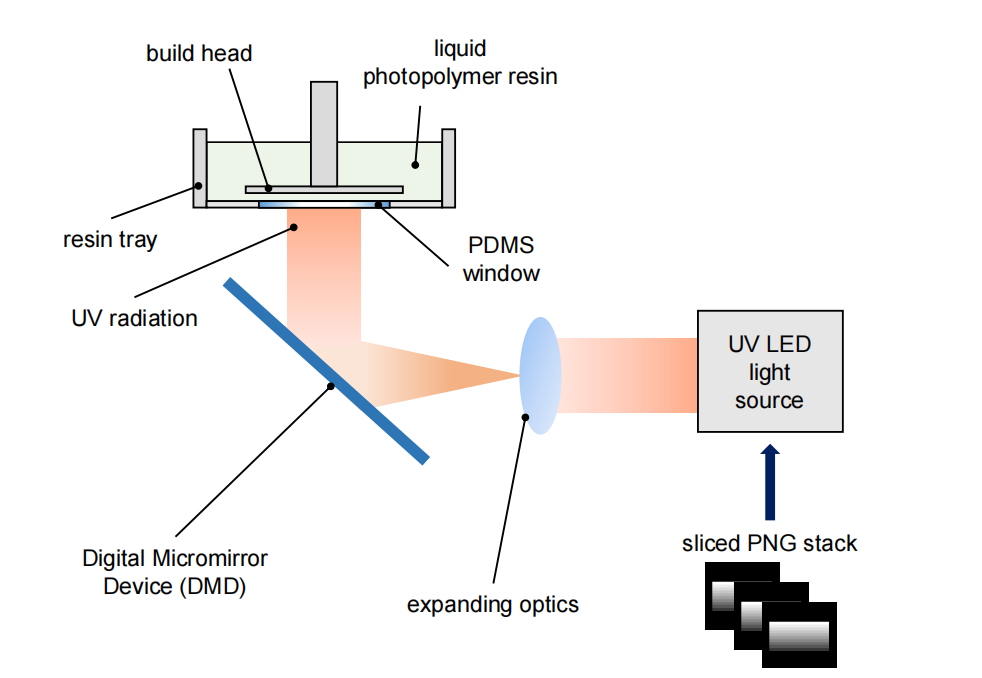
How does DLP 3d printing work?
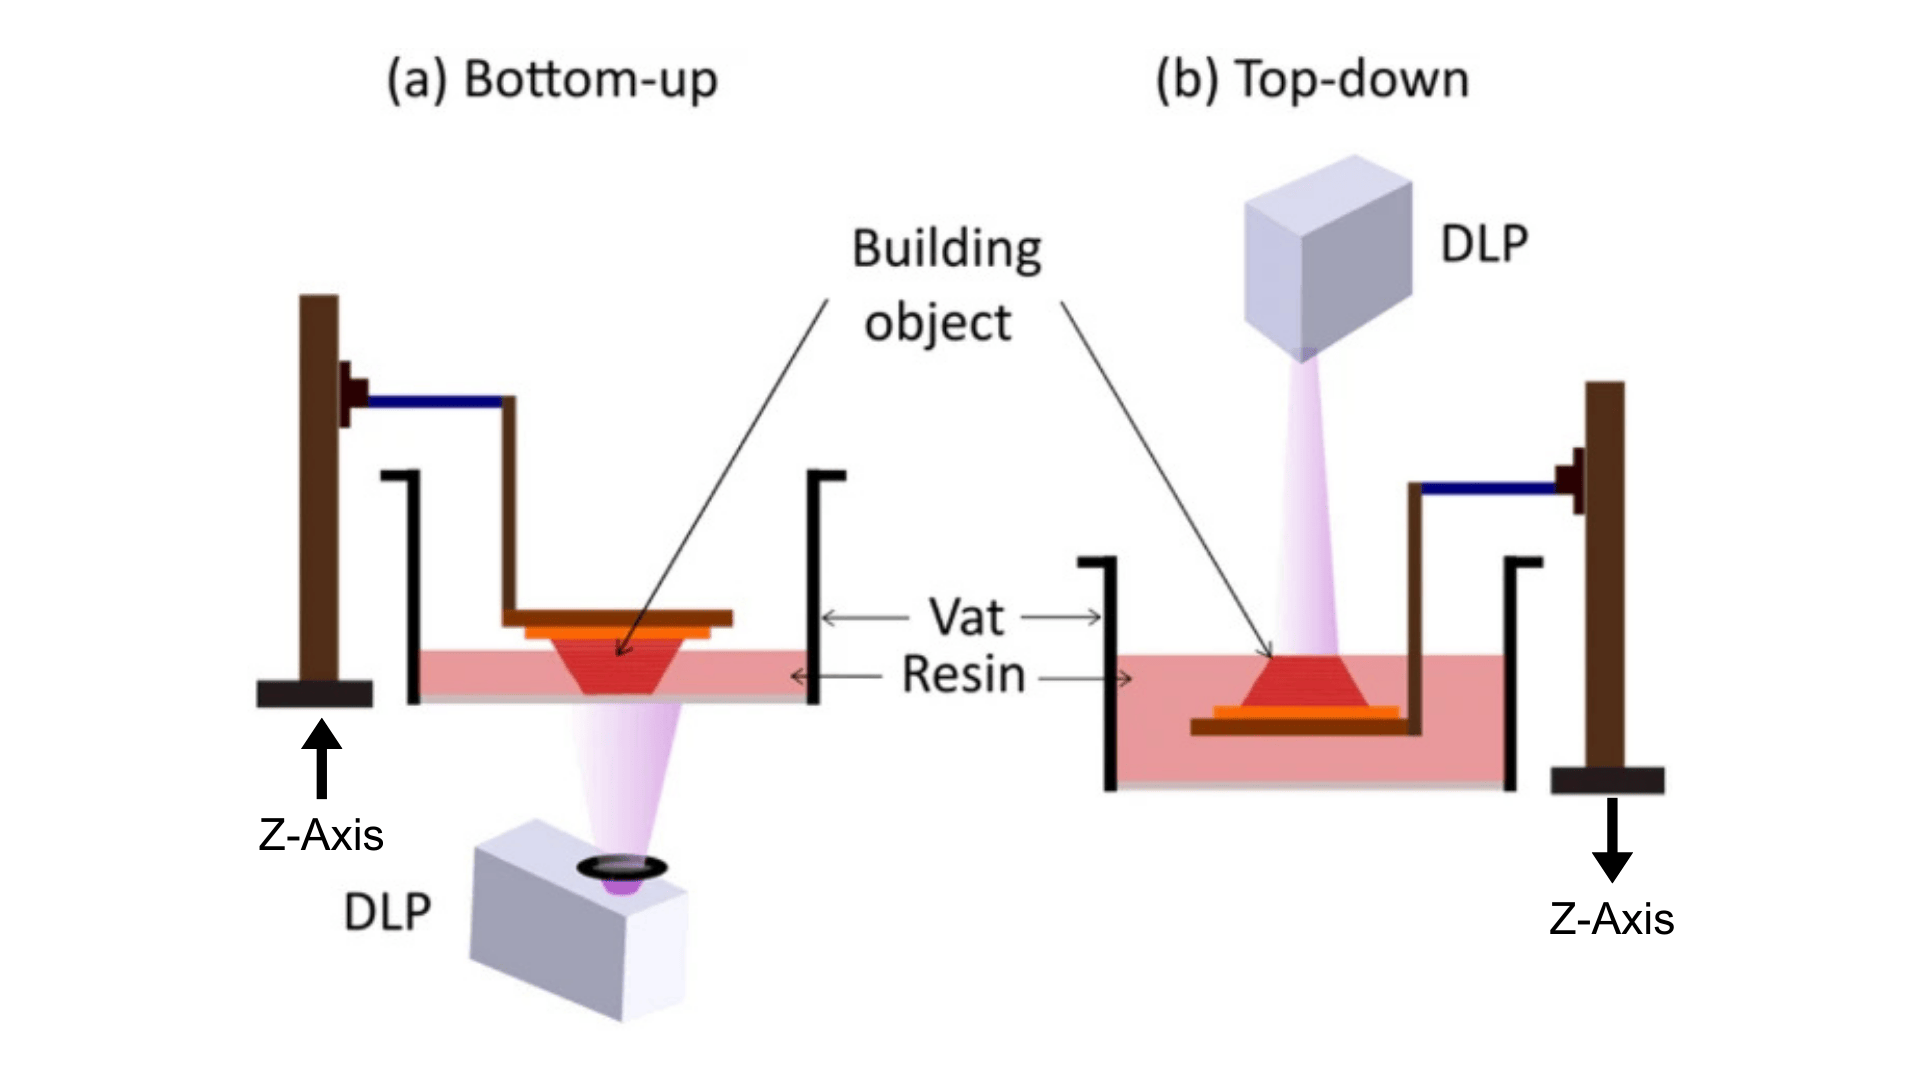
Based on the different directions of light source direction and build platform movement, DLP 3D printing can be categorized into bottom-up and top-down types. Both types work on the same principle: a digital light pattern is projected onto a vat of liquid photopolymer resin, curing each layer of the resin selectively.
-
Bottom-up: The build platform starts at the bottom of the resin vat and moves upwards as each layer is cured under the light from the bottom.
-
Top-down: The build platform starts at the top and moves down into the resin vat with each layer cured under the light from the top.
The components of a DLP 3D printer
|
Component |
Bottom-up DLP Printer |
Top-down DLP Printer |
|---|---|---|
|
Light Source: UV LED+DMD (Digital Micromirror Device)+Projector |
DLP projector located beneath the resin vat, projecting light upward. |
DLP projector located above the resin vat, projecting light downward. |
|
Transparent Vat Bottom |
Essential component made of FEP, PDMS, or glass. Allows light to pass through and withstands peeling force. |
Not required. |
|
Resin Vat |
Shallow vat with a transparent bottom to enable light projection. |
Deeper vat designed to hold more resin. |
|
Build Platform |
Starts close to the transparent bottom and moves upward after each layer. |
Starts near the resin surface and moves downward into the resin. |
|
Z-axis Mechanism |
Raises the platform after each layer is cured. |
Lowers the platform after each layer is cured. |
|
*Peeling System |
Required to separate cured layers from the vat bottom and prevent sticking. |
Not required, as curing occurs at the resin surface. |
-
Flexible film vat – A bottom film (e.g., FEP) flexes during platform movement to ease detachment.
-
Tilt mechanism – Tilts the vat or build platform to gradually peel the cured layer from one side.
-
Slow lift motion – Lifts the platform slowly and steadily to reduce stress on the part.
-
Layer delay – Introduces a pause after curing to allow resin flow and release tension.
DLP 3D Printing Process

The DLP printing process is organized in the following table in sequential order.
|
Step |
Bottom-up DLP Printing Process |
Top-down DLP Printing Process |
|---|---|---|
|
Resin Preparation |
A shallow vat with a transparent bottom is filled with liquid photopolymer resin. |
A deep vat is filled with resin, covering the build platform. |
|
Platform Positioning |
Build platform starts close to the vat bottom (just one layer height above the transparent film). |
Build platform starts just below the resin surface. |
|
Image Projection |
Light is projected upward through the transparent bottom to cure the first layer against the platform. |
Light is projected downward onto the resin surface to cure the first layer at the platform interface. |
|
Layer Curing |
Each layer is cured against the vat bottom. |
Each layer is cured at the resin surface. |
|
Peeling / Separation |
Platform raises to peel the cured layer from the vat bottom, then lowers to the next layer height. |
No peeling needed; curing occurs at the surface. |
|
Repositioning |
Platform lowers slightly to allow resin to flow, then raises again to the next layer height for curing. |
Platform lowers incrementally for the next layer to be cured at a deeper level. |
|
Repeating Process |
Steps 3–6 are repeated until the full model is built upward from the platform. |
Steps 3–6 are repeated as the model is formed downward into the vat. |
|
Post-processing |
Printed part is removed, cleaned, and post-cured (UV). |
Same post-processing steps are followed. |
Takeaways of key differences:
-
Platform Starting Position:
-
Bottom-up: Starts close to the resin vat bottom.
-
Top-down: Starts near the resin surface.
-
-
Platform Movement:
-
Bottom-up: Platform raises after each layer, then lowers. Platform raises after each layer to ensure proper separation, then lowers to allow the next layer to be cured.
-
Top-down: Platform lowers after each layer.
-
-
Layer Curing:
-
Bottom-up: Curing starts from the vat bottom.
-
Top-down: Curing happens at the resin surface.
-
Bottom-up VS. Top-down
|
Bottom-up |
Top-down |
|
|---|---|---|
|
Printing Size |
Typically used for smaller prints, suitable for precise structures |
Better suited for large models |
|
Advantages |
Material-efficient, cost-effective, commonly used in desktop devices |
No need for peeling, suitable for large items, high success rate |
|
Disadvantages |
Requires peeling system, may experience failed layers or bubbles |
High resin waste, expensive |
|
Equipment Complexity |
Moderate (but requires high-quality membranes) |
High (requires large-area uniform projection and precise Z-axis control) |
SLA vs. DLP vs. LCD(MSLA) vs. Polyjet
SLA, DLP, LCD (MSLA), and Polyjet are the four main 3D printing resin technologies. The comparison table below highlights their key differences.
|
SLA |
DLP |
LCD, or MSLA |
Polyjet |
|
|---|---|---|---|---|
|
Process |
A laser precisely cures resin point by point. |
A projector cures an entire layer at once with a flashed image. |
An LCD screen shapes UV light to cure full layers, similar to DLP. |
Inkjet-style print heads jet and cure layers of resin. |
|
Print Accuracy & Surface Quality |
⭐️⭐️⭐️ |
⭐️⭐️ |
⭐️ |
⭐️⭐️⭐️ |
|
Print Speed |
⭐️ |
⭐️⭐️⭐️ |
⭐️⭐️⭐️ |
⭐️⭐️ |
|
Price |
⭐️⭐️⭐️ |
⭐️⭐️ |
⭐️ |
⭐️ |
|
Printable Size |
Medium to large (varies by machine) |
Small to medium (projector limits) |
Small to medium (screen size limits) |
Small to medium |
|
Best For |
Precision work (jewelry, dental) |
Small detailed batches (miniatures) |
Budget prints with solid detail |
High-end prototypes, visual models |
In summary:
-
SLA produces the finest details but is pricier.
-
DLP balances cost, speed and detail, ideal for miniatures.
-
LCD is the most budget-friendly, with lower surface quality.
-
Polyjet offers the best finish and multi-materials, but at the highest cost. ==Unsure tech banner==
Materials for DLP 3D Printing
The primary material used in DLP printing is photosensitive resin. Below, we classify the common types of resins based on their properties and uses.
|
Resin Type |
Common Uses |
Application Scope |
|---|---|---|
|
Standard Resin |
Visual models, figurines, basic prototypes |
Desktop & Industrial |
|
High-Temperature Resin |
Heat-resistant parts, mold tooling, engine components |
Industrial |
|
High Detail/Ultra Detail Resin |
Miniature sculptures, intricate prototypes, fine-scale models |
Desktop & Industrial |
|
Flexible Resin |
Gaskets, grips, soft prototypes, wearable components |
Desktop & Industrial |
|
Transparent Resin |
Lenses, light covers, fluid containers, display parts |
Desktop & Industrial |
|
Tough / Rigid Resin |
Functional parts, brackets, casings, impact-resistant prototypes |
Desktop & Industrial |
|
Castable Resin |
Jewelry molds, dental casting, investment casting patterns |
Industrial |
|
Dental/Medical Resin |
Surgical guides, dental models, aligners, biocompatible medical components |
Industrial |
How much does DLP 3D Printing cost?
DLP 3D printing costs can vary significantly depending on whether you print in-house or outsource the job. Here, we will break the printing cost down to help you make decisions.
Self Printing
Self-printing involves a variety of costs, so we’ve compiled a table listing the possible expenses along with explanations.
|
Category |
Item |
Description |
|---|---|---|
|
Equipment Cost |
Desktop DLP 3D Printer |
Entry-level models: $200–$500 |
|
Wash & Cure Machine |
$50–$150, optional but highly recommended |
|
|
Material Cost |
Resin (Standard or Specialty Types) |
$30–$50/kg for standard; up to $200/kg for engineering or specialty resins |
|
Consumables |
Gloves, Masks |
For safe handling of liquid resin |
|
Alcohol (IPA or similar) |
~$10–$20/month depending on usage |
|
|
FEP Film |
Replace every 1–3 months; ~$10–$20 each |
|
|
Funnel / Resin Filter |
For cleaning and reusing resin |
|
|
Charcoal Filter / Mini Purifier |
Recommended for indoor use due to resin odor and VOCs |
|
|
Cleaning Solution / Containers |
For IPA storage, cleaning trays, etc. |
|
|
Software Cost |
Slicer Software (e.g., Chitubox, Lychee) |
Free basic versions; Pro versions optional |
|
Other Costs |
Failed Prints / Wasted Resin |
Includes misprints due to exposure errors or poor supports |
|
Test Prints |
Used for exposure calibration, support testing, etc. |
Outsourcing
If you’re choosing to outsource your DLP 3D printing, the process is more streamlined, but it helps to understand how pricing is calculated by service providers. The total cost is typically determined using this formula:
Total 3DP Cost = Printing Cost (Material Unit Price × Material Volume) + Post-processing Charges + Packaging Cost + Shipping + Applicable Taxes
Notes:
-
Basic post-processing tasks such as cleaning and support removal are often included at no extra charge.
-
Additional fees may apply for large prints or delicate parts that require protective packaging, such as wooden crates or air-shipping boxes. Standard packaging using cardboard boxes and foam/bubble wrap is generally free.
-
Taxes vary based on local regulations but typically range from 5% to 20% of the total cost.
Want a more detailed look at 3D printing pricing? Take a look at our earlier article: How Much Does It Cost to 3D Print Something?
Interested in estimating the cost of your part? Try Unionfab’s free online 3D printing cost calculator below.
Unionfab’s DLP 3D Printing Service
With 20+ years of expertise, 1,000+ industrial 3D printers, and 6 cutting-edge factories, Unionfab, certified with ISO 9001, ISO 13485, and AS 9001D, is committed to delivering high-quality, cost-effective 3D printing services.
To give you a better understanding of our DLP 3D printing capabilities, we’ve prepared a VR video for a virtual factory tour. Click the GIF below to start now!

Unionfab’s DLP 3D Printing Service
|
DLP |
|
|---|---|
|
Equipment |
Uniontech |
|
Materials |
Ultra Detail Resin |
|
Max Part Size |
300 x 140 x 240 mm |
|
Layer Thickness |
0.1mm |
|
Tolerance |
±0.3% |
|
Min. Feature Size |
Normal Resolution: X-Y: 0.254mm Z: 0.406mm |
|
Min. Wall Thickness |
0.7 mm |
|
Min. Reference Unit Price of Materials |
Standard Resin (White): $0.14/g |
|
Post-processing Available |
Sanding; Painting; Vacuum plating; Silk screening; Dyeing; Electroplating |
|
Pass Rate |
99.5% |
|
On-time Delivery Rate |
99% |
*The actual unit price is subject to real-time inquiry.
If you haven’t used Unionfab’s 3d printing service before, sign up to get 10% discount for your first order.

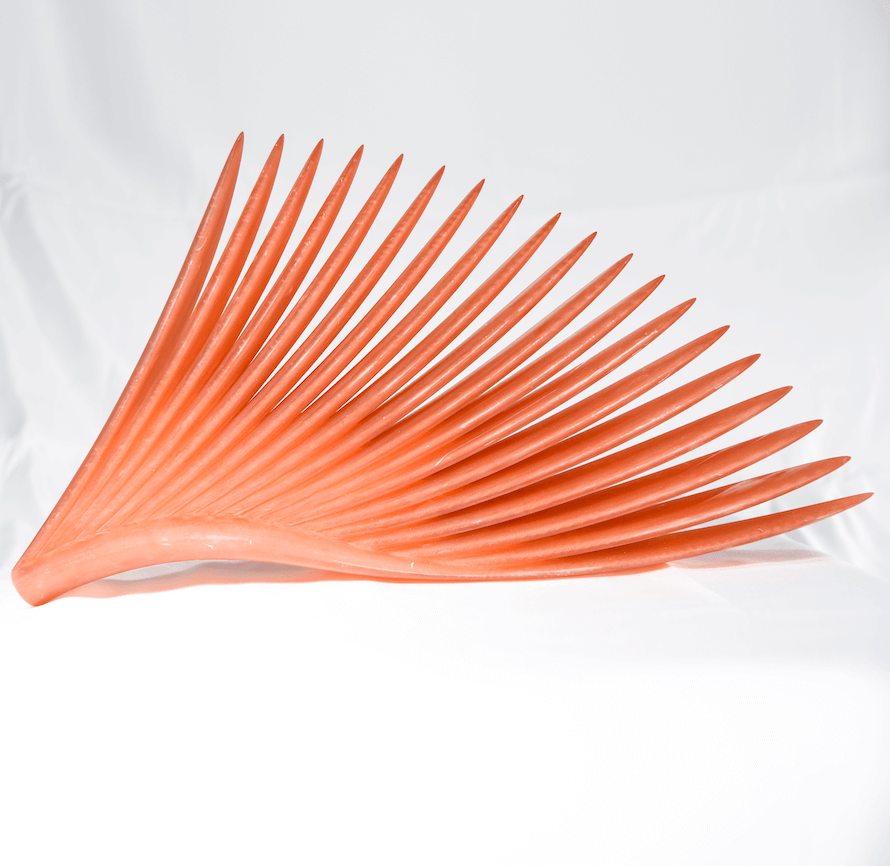
DLP 3D Printing Case Displays
The followings are some DLP-printed resin prints made by Unionfab.
 |
 |
|---|---|
 |
 |
 |
     |