Learn about custom heat sinks, including materials, manufacturing methods, design tips, cost factors, and the ordering process.
Introduction
As electronic devices get smaller and more powerful, heat management becomes critical. Overheating can slow, damage, or permanently break a device.
Standard heat sinks work for many projects, but tight spaces or extreme performance needs require custom solutions.
This guide explains custom heat sinks and covers why they matter, how to choose materials and manufacturing methods, design tips for optimal thermal performance, and cost considerations.
What Is a Heat Sink?
A heat sink is a thermal management component designed to control excess heat generated during operation and keep systems within safe temperature limits. By efficiently dissipating this waste heat, it helps electronic and mechanical devices maintain stable performance and long-term reliability.
Below is a concise overview of the key characteristics of a typical heat sink.
|
Aspect |
Description |
|---|---|
|
Purpose |
Dissipates waste heat from critical components to prevent thermal damage and maintain system performance |
|
Heat Transfer Mechanism |
Heat is conducted from the source into the heat sink and then dissipated to the surrounding environment via convection and radiation |
|
Key Components |
Typically consists of a base that contacts the heat source and fins that increase surface area; advanced designs may also incorporate heat pipes or thermal interface materials |
|
Common Materials |
Mainly aluminum for lightweight and cost efficiency, and copper for higher thermal conductivity |
|
Common Applications |
CPUs and GPUs, LED lighting systems, power electronics, and EV motor controllers |
For a more in-depth discussion of heat sink fundamentals and advanced design approaches, see our Guide to 3D Printed Heat Sinks.
Custom vs. Standard Heat Sinks
Selecting between a standard off-the-shelf (OTS) heat sink and a custom-engineered solution is a critical decision that directly affects thermal performance, system reliability, and total cost of ownership.
Standard heat sinks provide convenience and lower upfront cost, but custom designs are often required for applications with high power density, limited space, or strict performance constraints.
The table below summarizes why custom heat sinks are frequently the preferred option for high-performance systems.
|
Feature |
Standard Heat Sinks |
Custom Heat Sinks |
|---|---|---|
|
System Integration |
Forces Adaptation. The PCB and enclosure must be designed around the heat sink. |
Purpose-Built. Mounting features, cutouts, and interfaces are integrated to match the exact system layout. |
|
Thermal Optimization |
Generic. Uniform fin density manages average heat loads but cannot address localized hot spots. |
Targeted. Fin geometry is optimized for localized hot spots and high heat flux regions. |
|
Geometry & Mounting |
Fixed. Standard profiles and mounting patterns often waste available space. |
Flexible. Contoured shapes and custom mounting options enable efficient use of tight or irregular spaces. |
|
Airflow Efficiency |
Suboptimal. Generic fin layouts may create airflow resistance or stagnant zones. |
Optimized. Fin structures are designed to align with the actual airflow characteristics of the cooling system. |
|
Weight & Material |
Basic. Typically limited to standard aluminum or copper profiles. |
Advanced. Material selection and internal structures can be optimized to reduce weight while maintaining performance. |
|
Manufacturing |
Commoditized. Primarily limited to mass-produced, fixed-geometry processes such as basic extrusion, stamping, or standard die casting. |
Advanced & Hybrid. Enables high-performance fabrication techniques (e.g., skiving, CNC machining, and bonded fins) and supports the integration of two-phase thermal components such as vapor chambers and heat pipes. |
In summary: Standard heat sinks are suitable for low-power and non-critical applications. For systems with tight space constraints, strict weight limits, or high thermal loads, custom heat sinks become a functional requirement rather than an optional upgrade.
Manufacturing Methods for Custom Heat Sinks
Once you’ve determined that a custom heat sink is required, the next critical step is selecting the appropriate manufacturing method. Each process influences thermal performance, cost, structural integrity, and how well the heat sink integrates with your system.
We categorize heat sink manufacturing methods based on typical application, performance, and production scale.
1. Standard / Base Processes
These methods form the foundation of the heat sink industry. They are widely used due to mature supply chains, predictable costs, and good performance for many applications.
Extrusion
This process involves pushing hot aluminum billets through a steel die to create a specific cross-sectional profile with uniform fins. It is the most ubiquitous manufacturing method in the thermal industry.
-
Best For: Medium-to-high volume production for general electronics, industrial equipment, and LED lighting.
-
Pros: Extremely low unit cost; minimal secondary machining required; excellent thermal conductivity (using 6000-series aluminum).
-
Cons: Limited to 2D profiles (cross-section must be uniform); fin height and density are restricted by the strength of the steel die (fin-to-gap ratio).
Stamping
Stamping uses progressive dies to punch and fold thin sheets of copper or aluminum into specific shapes. These are often soldered onto a base or folded into “zipper fins” to increase surface area without adding significant weight.
-
Best For: High-volume, lightweight applications like laptop cooling modules or board-level components.
-
Pros: Lowest cost per unit at mass scale (millions of parts); very lightweight; allows for complex folding patterns.
-
Cons: High initial tooling costs (NRE); lower thermal capacity compared to solid blocks; requires assembly (soldering) if attached to a base.
Die Casting
Molten metal (typically aluminum or zinc alloys) is injected into a mold under high pressure to form complex 3D shapes. This is ideal when the heat sink must also function as a structural housing or enclosure.
-
Best For: Exterior housings (e.g., streetlights, automotive ECUs) and complex structural components.
-
Pros: Capable of forming complex 3D geometries, mounting bosses, and connector holes in a single step; excellent dimensional repeatability.
-
Cons: The cast metal is porous and contains impurities, resulting in significantly lower thermal conductivity than extruded aluminum; tooling molds are very expensive.
2. High-Performance Processes
When standard extrusion cannot provide enough surface area or the thermal density is too high, these processes maximize cooling potential.
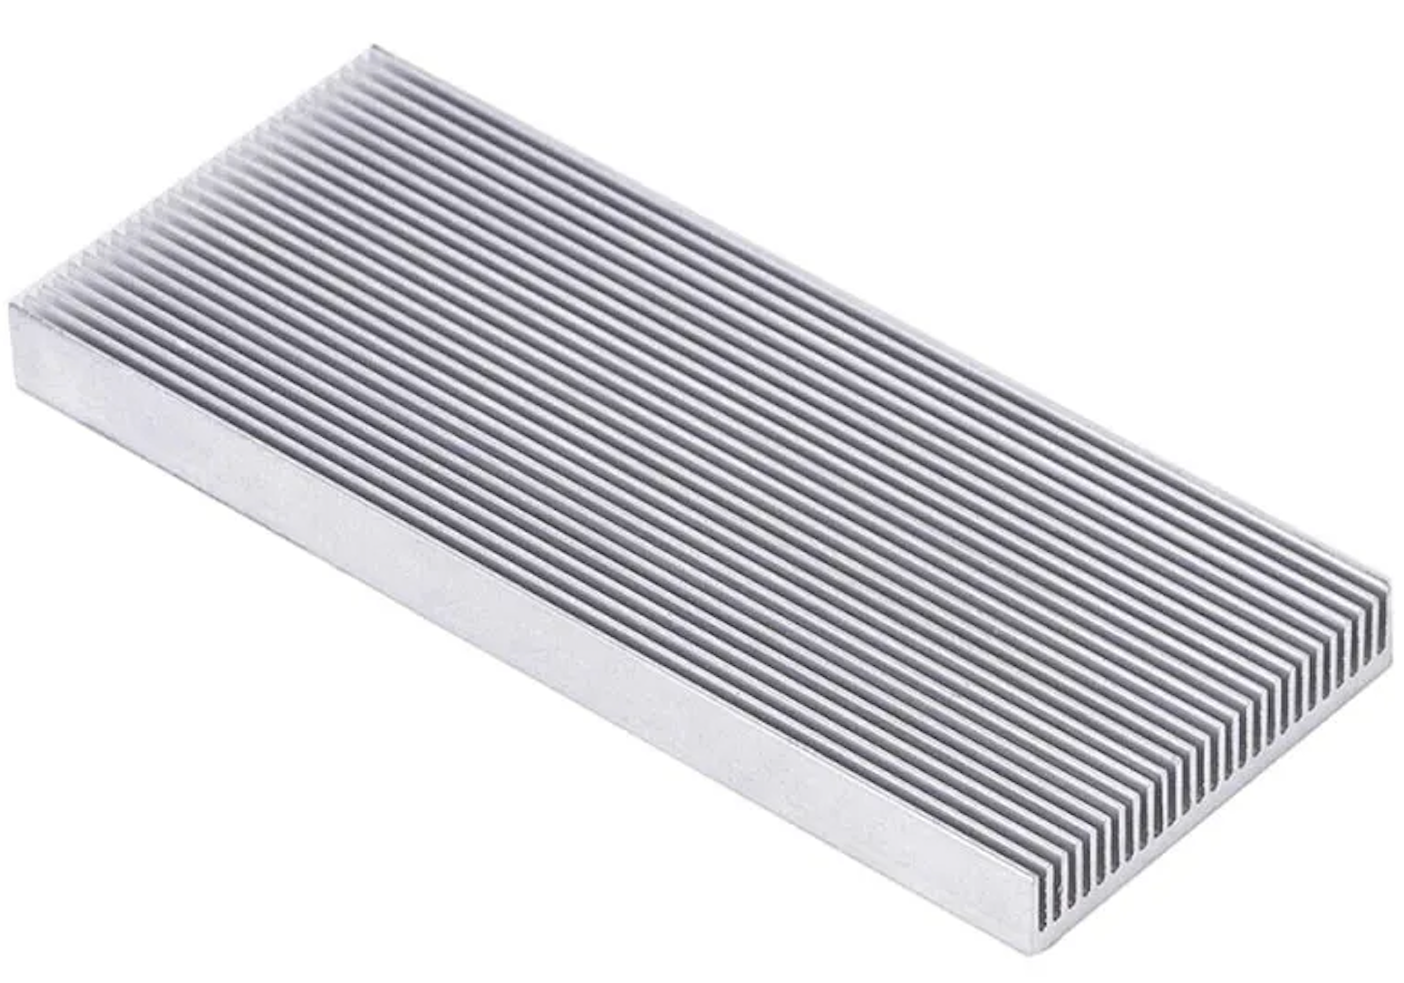
Skiving (Skived Fins)
Skiving uses a precise blade to slice thin layers of metal from a solid block and bend them upright to form fins. Because the fins are carved from the base itself, there are no joints or welding points.
-
Best For: High-performance servers, telecommunications, and liquid cooling cold plates where space is tight.
-
Pros: Achieves extremely high fin density and thinness; minimal interface thermal resistance (continuous material); low tooling costs compared to extrusion.
-
Cons: Slower production time per unit; requires directional airflow; fins can be fragile.
Cold Forging
This process uses high pressure to squeeze raw material into a die at room temperature, typically to create “pin fin” or elliptical fin heat sinks.
-
Best For: Applications with omnidirectional airflow, such as LED light bulbs or passive cooling in open environments.
-
Pros: Produces a dense, strong material structure with excellent thermal conductivity; allows for pins and round shapes that extrusion cannot produce.
-
Cons: Limited design complexity (cannot create complex internal channels); the maximum size is limited by available press capacity.
3. Advanced / Hybrid Assemblies
For applications with extreme power densities (such as high-end GPUs or power electronics), simple metal conduction is often insufficient. This category involves assembly and integration rather than just forming.
Heat Pipe & Vapor Chamber Integration
This technique embeds two-phase cooling devices—Heat Pipes or Vapor Chambers (VC)—into the base of the heat sink. These are typically soldered to Skived Fins or Zipper Fins to disperse heat rapidly.
-
Best For: High-power density components (CPUs, GPUs, IGBTs) where a concentrated “hot spot” must be spread quickly.
-
Pros: Overcomes the thermal conductivity limits of solid copper/aluminum; spreads heat instantly across a large surface area; handles extreme heat flux.
-
Cons: High manufacturing cost; adds complexity to the assembly process; potential reliability risks if the vacuum chamber of the vapor chamber fails or leaks.
4. High-Precision & Complex Fabrication
For projects requiring strict tolerances, complex geometries, or mirror-smooth finishes, these advanced methods are used for both prototyping and high-value production.
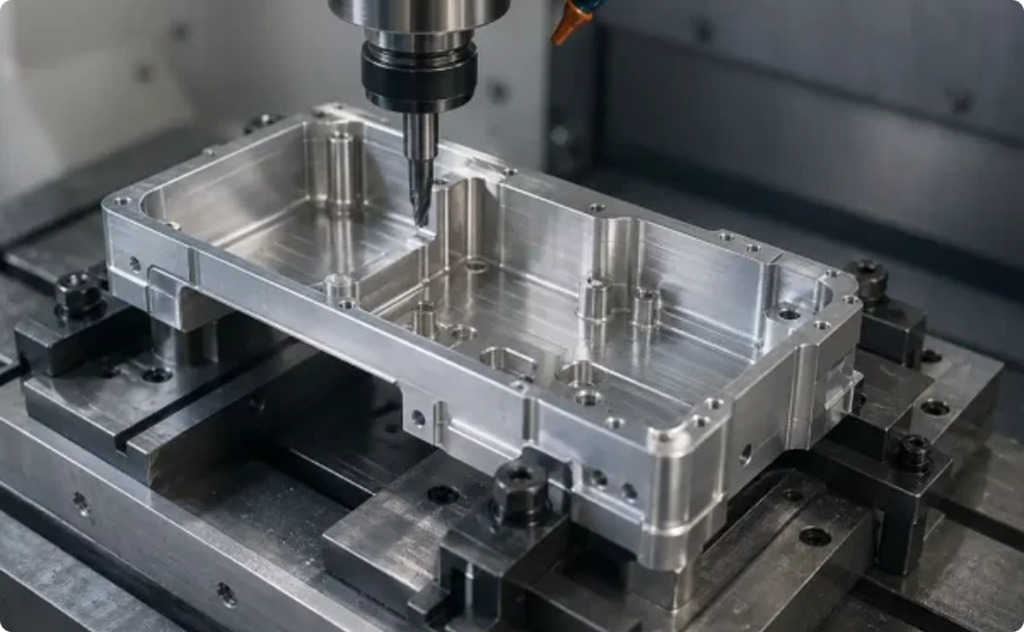
CNC Machining
CNC (Computer Numerical Control) machining is a subtractive process where material is removed from a solid block to create the heat sink.
-
Best For: High-performance functional parts, precision prototypes, and low-volume production.
-
Pros: No tooling costs; high precision; allows for cross-cut fins and varying fin heights to maximize airflow in specific zones.
-
Cons: Very high cost per unit; slow production time; significant material waste.
Metal 3D Printing (Additive Manufacturing)
Metal 3D printing builds the heat sink layer by layer using laser powder bed fusion.
-
Best For: Research, proof-of-concept, and impossible geometries such as lattice structures or internal cooling channels that maximize surface area within a tiny footprint.
-
Pros: Unlimited design freedom; ability to create internal lattice structures.
-
Cons: Highest cost; surface finish is often rough (requires post-processing)
If you’re considering CNC machining or metal 3D printing for your heat sink design, you can quickly estimate the cost using our instant quoting system.
Comparison of Manufacturing Methods
The following table compares these methods to help align your technical requirements with manufacturing realities.
|
Method |
Thermal Performance |
Design Freedom |
Cost Effectiveness |
Best for |
|---|---|---|---|---|
|
Extrusion |
★★★☆☆ |
★★☆☆☆ |
★★★★★ |
General electronics, LED, Industrial. |
|
Stamping |
★★☆☆☆ |
★★★☆☆ |
★★★★☆ |
Board-level components, Laptop coolers. |
|
Die Casting |
★★☆☆☆ |
★★★★☆ |
★★★☆☆ |
Structural housings, Enclosures. |
|
Skiving |
★★★★☆ |
★★★☆☆ |
★★★☆☆ |
Servers, High-performance PCs. |
|
Cold Forging |
★★★★☆ |
★★☆☆☆ |
★★★☆☆ |
Omni-directional airflow (LEDs). |
|
Hybrid (Vapor Chamber) |
★★★★★ |
★★★★☆ |
★★☆☆☆ |
High-power CPU/GPU, Power electronics. |
|
CNC Machining |
★★★★☆ |
★★★★★ |
★★☆☆☆ |
Prototypes, low volume production. |
|
3D Printing |
★★★☆☆ |
★★★★★ |
★★☆☆☆ |
Complex prototypes, lattice structures. |
Summary: Which to Choose?
Choose the method based on your volume, thermal performance needs, geometric complexity, and budget.
-
For High-Volume & Cost Efficiency: Choose Extrusion.
-
For Lightweight or Tight Spaces: Choose Stamping.
-
For Structural or Complex Shapes: Choose Die Casting.
-
For Maximum Air-Cooling Performance: Choose Skived Fins or Cold Forging.
-
For Extreme Thermal Loads: Choose Hybrid Assembly (Vapor Chambers / Heat Pipes).
-
For Prototyping & Complex Geometries: Choose CNC Machining or Metal 3D Printing.
Material Selection for Custom Heat Sinks
Selecting the right material requires balancing thermal performance, weight, manufacturability, and cost. While heat sink geometry (fins, shape, size) governs airflow interaction, the material determines how efficiently heat moves from the source to the cooling surfaces.
In the industry, the choice almost always comes down to Aluminum or Copper, though specialty materials like Graphite or Ceramics are increasingly used for niche requirements.
1. Aluminum Alloys (Cost-Effective & Lightweight)
Aluminum is the most ubiquitous material in thermal management. It offers the best “bang for your buck” and is the go-to choice for the vast majority of custom heat sink projects.
-
Thermal Conductivity: ~160 to 220 W/m·K (depending on the alloy and temper).
-
Key Characteristics:
-
Lightweight: At a density of ~2.7 g/cm³, it is ideal for weight-sensitive applications like aerospace, automotive, and portable electronics.
-
Excellent Manufacturability: Its ductility makes it the perfect candidate for high-volume Extrusion and Die Casting.
-
Surface Finishing: Unlike copper, aluminum can be Anodized. This not only prevents corrosion and provides electrical insulation but can also increase surface emissivity for better radiation cooling.
-
-
Common Alloys:
-
AL 6063: The gold standard for Extrusion. It offers high conductivity (~200 W/m·K) and a superior surface finish.
-
AL 6061: Commonly used for CNC Machined heat sinks. It is stronger and more rigid than 6063 but has a lower conductivity (~150–170 W/m·K).
-
AL 1050/1100: Used in Cold Forging or Skiving; offers much higher conductivity (~220 W/m·K) but is structurally softer.
-
2. Copper (The High-Performance Choice)
When power densities are extreme and space is a luxury, engineers turn to copper. While it excels at heat transfer, its weight and cost require careful justification.
-
Thermal Conductivity: ~390–400 W/m·K.
-
Key Characteristics:
-
Rapid Heat Spreading: With nearly double the conductivity of aluminum, copper is unmatched at reducing “spreading resistance” and pulling heat away from high-flux hot spots.
-
High Density: Copper is 3 times heavier than aluminum (8.96 g/cm³), which can be a dealbreaker for mobile or airborne systems.
-
Processing Challenges: Copper is harder to extrude. It is typically processed via Skiving, CNC, or Forging. It also requires plating (usually Nickel) to prevent oxidation.
-
-
Best for: High-end CPU/GPU coolers, IGBT modules, and Hybrid Designs (e.g., a copper base to “soak” the heat, paired with aluminum fins to “shed” it).
3. Specialty Materials (Graphite & Ceramics)
For applications where traditional metals are restricted by weight or electrical requirements:
-
Natural/Synthetic Graphite: Extremely light with incredible In-Plane conductivity (up to 1500 W/m·K). However, its conductivity is “anisotropic” (much lower through the thickness), making it excellent as a heat spreader, but unsuitable for traditional fin structures.
-
Ceramics (AlN, Al₂O₃): Used when Electrical Isolation is mandatory. Aluminum Nitride (AlN) provides high conductivity (~150–200 W/m·K) without being electrically conductive, though it is brittle and relatively expensive.
Key Design Tips for Custom Heat Sinks
Designing a custom heat sink is a balancing act between physics, available space, and manufacturing capabilities. Use these tips to ensure your design performs well in the real world.
1. Thermal Performance Fundamentals
The primary job of a heat sink is to move heat away from the source efficiently.
Optimize the Base Contact
-
Flatness is Key: The bottom of the heat sink (the base) must be perfectly flat and smooth. Even microscopic roughness creates air gaps that block heat. CNC machining is often the best way to achieve this mirror-like finish, ensuring maximum contact with the chip.
-
Thicker Bases Help: A base that is too thin creates “hot spots.” A thicker base helps spread the heat evenly across all the fins before it dissipates.
Respect Gravity and Orientation
-
Heat Rises: Natural convection relies on hot air rising. If your device is mounted vertically, align the fins up and down (not side-to-side) so hot air can escape naturally.
-
Impedance: Avoid placing tall components immediately above the heat sink, as they can block the rising hot air.
2. Structural Design Factors
A heat sink must fit physically within your device without causing mechanical issues.
Weight Management
-
Material Weight: Copper offers better performance but is much heavier than aluminum. Ensure your circuit board or mounting clips can support the weight without bending or breaking.
-
Center of Gravity: A heavy heat sink can make a small device top-heavy or unstable.
Clearance and Keep-Out Zones
-
Check Surroundings: Ensure the heat sink does not touch nearby capacitors or connectors.
-
Assembly Space: Leave enough room for the screwdriver or tool needed to install the heat sink. If the fins are too tall or wide, you might block the mounting holes.
3. Fin Design and Surface Area
Fins are where the heat leaves the metal and enters the air. The design depends heavily on how air moves through your system.
The “More is Better” Trap
-
Surface Area: Generally, more fins mean more surface area to release heat.
-
The Bottleneck: If fins are packed too closely together, air gets trapped and creates a “dead zone.” You must leave enough gap for air to flow freely.
Match Design to Airflow
-
Passive Cooling (No Fan): Use widely spaced fins. This relies on natural air movement. If fins are too dense, the heat will simply stagnate.
-
Active Cooling (With Fan): You can use denser, thinner fins. The high pressure from the fan forces air through the tight gaps, stripping away heat faster.
4. Design Tools and Simulation
Before cutting metal, use digital tools to validate your assumptions.
3D CAD Modeling (Fit Check)
-
Use software to place the heat sink model into your full device assembly.
-
This confirms that the intake and exhaust vents align with your fin direction and that there are no physical collisions.
CFD Simulation (Thermal Check)
-
What it is: Computational Fluid Dynamics (CFD) simulates airflow and temperature distribution.
-
Why use it: It helps you see if the chip stays under the maximum safe temperature. It is much cheaper to adjust a digital model than to manufacture a prototype that doesn’t work.
How to Get a Custom Heat Sink: The Ordering Process
Ordering a custom part involves four distinct steps. Following this path ensures you get a product that fits your device and performs correctly.
1. Define Your Specifications
Before contacting a manufacturer, you must have clear requirements.
-
Dimensions: What is the maximum height, width, and length allowed in your enclosure?
-
TDP (Thermal Design Power): How many Watts of heat does your chip generate?
-
Max Temperature: What is the highest safe operating temperature for your device?
2. Create or Commission CAD Files
Manufacturers cannot work from a sketch on a napkin. You need a 3D model.
-
Do It Yourself: Use software like SolidWorks or AutoCAD to create a 3D model (usually a STEP or IGES file).
-
Hire a Pro: If you aren’t a designer, hire a mechanical engineer to create the file for you.
3. CFD Validation (Thermal Simulation)
Before spending money on metal, test the design on a computer.
-
What it is: Computational Fluid Dynamics (CFD) software simulates airflow and heat transfer.
-
Why it helps: It predicts if your design will actually keep the chip cool. It is cheaper to fix a digital design than a physical prototype.
4. Manufacturer Selection
Choose a factory based on how many units you need.
-
Low Volume / Prototyping: Look for shops that specialize in CNC machining or metal 3D printing. They have no setup fees but higher per-unit costs.
-
Mass Production: Look for factories that do Aluminum Extrusion or Die Casting. These require expensive molds (tooling) but make the per-unit cost very low.
Cost and Trade-Offs
Understanding where your budget goes and what compromises to make is essential for a successful custom project. A custom heat sink will always cost more than a standard part, but knowing the cost drivers helps you spend money efficiently.
1. Cost Breakdown
The price of a custom heat sink is split into upfront fees and the cost of each individual part.