Discover ASA 3D printing, its advantages and drawbacks, applications, properties, how to print with ASA effectively, and outsourcing options.
Introduction
ASA 3D printing uses a durable, weather-resistant filament known for its UV resistance, temperature stability, and impact strength, making it ideal for outdoor applications and prototypes.
In this blog, we’ll explore everything you need to know about ASA 3D printing, from its key benefits and potential drawbacks to its best use cases and material properties, as well as provide insights on how to print with ASA successfully.
Additionally, if you’re looking for high-quality results without the hassle of managing the printing process yourself, outsourcing to a professional service provider may be the right solution for your project.
What is ASA 3D Printing?
Source: Stratasys.com
ASA (Acrylonitrile Styrene Acrylate) 3D printing refers to the process of using ASA filament — a high-performance thermoplastic — in FDM (Fused Deposition Modeling) printers. This material is similar to ABS but offers superior UV resistance, temperature stability, and impact strength, making it an ideal material for producing durable, weather-resistant parts and outdoor applications.
Material Properties
Below is a table summarizing the key material properties of ASA used in 3D printing. This provides a clear overview of its mechanical and thermal performance for design and printing considerations:
|
Property |
*Typical Value |
|---|---|
|
Density (g/cm³) |
~1.07 |
|
Tensile Strength (MPa) |
~50–55 |
|
Elongation at Break (%) |
~6–12 |
|
Heat Deflection Temperature (℃) |
~90–100 |
|
Hardness (Shore D) |
~70–80 |
|
Glass Transition Temperature (℃) |
~105–108 |
|
Toughness (Impact Strength – XY, kJ/m²) |
~20–30 |
|
Strength (Bending Strength – XY, MPa) |
~60–75 |
|
Stiffness (Bending Modulus – XY, MPa) |
~1800–2400 |
|
Impact Resistance |
High |
|
Abrasion Resistance |
Good |
|
UV Resistance |
Excellent |
|
Oxidation / Aging Resistance |
High |
|
Chemical / Corrosion Resistance |
Good |
*Note: These values represent typical ASA material properties; exact performance can vary by manufacturer and formulation.
In short, ASA is a strong, tough, and weather-resistant filament. Its mechanical properties allow it to withstand impacts and bending stress, while its heat resistance, UV stability, and chemical resistance make it durable for long-term applications.
Print orientation affects performance, with XY-printed parts generally stronger than those printed along the Z-axis.
Overall, ASA 3D printing offers a balanced combination of strength, toughness, and environmental durability, making it a versatile choice for 3D printing functional and outdoor parts. Its superior UV resistance and high-temperature stability also ensure long-lasting results in challenging environments.
Pros & Cons
ASA is a versatile material that performs exceptionally well in demanding 3D printing applications. The following list summarizes its main advantages and potential drawbacks.
Pros
● Good UV resistance – Maintains color and strength even under prolonged sunlight exposure.
● High impact and wear resistance – Strong mechanical durability suitable for functional parts.
● High heat and temperature resistance – Keeps shape under high temperatures and thermal cycling.
● Water and chemical resistance – Resistant to moisture, oils, and common chemicals.
● Smooth surface finish – Easy post-processing, including sanding, cutting, painting, and acetone smoothing.
● Compatible with soluble support materials – Works well with HIPS or other dissolvable supports.
● Detailed prints with minimal stringing – Produces high-quality layer definition in FDM printing.
Cons
● High material cost – ASA filament is generally more expensive than ABS or PLA.
● Higher printing temperature requirements – Precise control of nozzle and bed temperature is necessary for stable performance.
● Prone to warping and cracking – Especially for large parts or without an enclosed chamber.
● Unpleasant styrene fumes – Emits noticeable odors during printing; proper ventilation or an air filtration setup is highly recommended.
● Moisture absorption – ASA easily absorbs humidity from the air, so pre-drying the filament helps ensure optimal print results.
Usage Scenarios
ASA’s combination of mechanical strength, UV stability, and weather resistance makes it ideal for a variety of real-world applications:
● Outdoor Equipment: Garden tools, outdoor signage, sports equipment prototypes, protective housings, and exterior signs that require long-term weather resistance.
● Automotive & Industrial Parts: Automotive exterior components, durable enclosures, electronic device housings, and mechanical parts that must withstand exposure to sunlight and harsh environments.
● Outdoor Electronics: Housings for devices such as sensors, lighting fixtures, or outdoor control panels that need both protection and aesthetic appeal.
● Functional Prototypes: Long-lasting prototypes used in testing, capable of resisting UV exposure, temperature changes, and humidity.
● Custom Consumer Products: Phone cases, bike accessories, or outdoor gadgets that combine durability with a clean, professional finish.
ASA vs. ABS vs. PLA
When deciding which material to use for your 3D printing project, it’s important to weigh the trade-offs between printability, strength, durability, and environmental resistance.
To help you quickly grasp the differences, we’ve highlighted the key performance aspects of ASA, ABS, and PLA in a radar chart below. This visual overview focuses on the dimensions most relevant to real-world applications, making it easier to choose the right material for your needs.
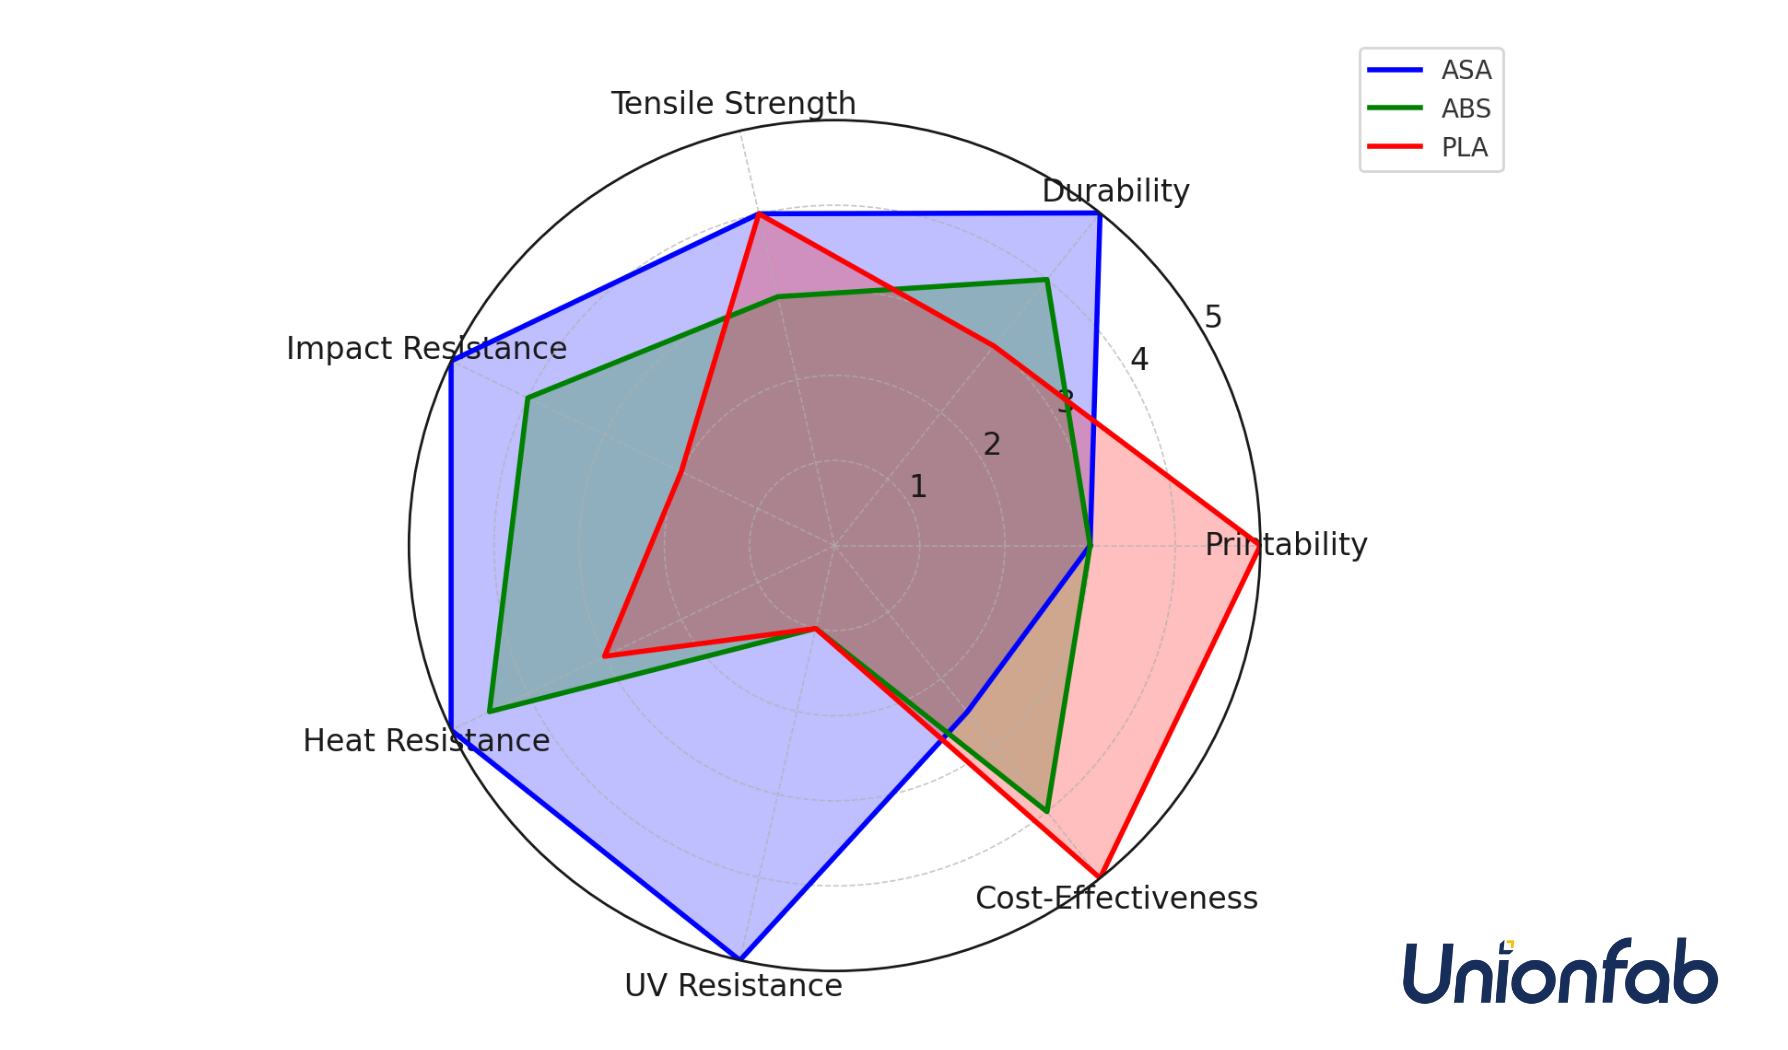
Source: Unionfab
While the radar chart gives a quick snapshot of how these materials compare on major user-focused aspects, the table below provides a more detailed breakdown of each filament’s technical specifications and properties.
Use this detailed view to make informed decisions, whether you’re designing functional prototypes, outdoor components, or everyday consumer products.
|
Aspect |
ASA |
ABS |
PLA |
|---|---|---|---|
|
Material Type |
Acrylonitrile Styrene Acrylate |
Acrylonitrile Butadiene Styrene |
Polylactic Acid |
|
Primary Applications |
Outdoor use, automotive, functional parts |
Functional parts, automotive, enclosures |
Consumer products, prototyping, toys |
|
Density (g/cm³) |
~1.07 |
~1.04 |
~1.24 |
|
Tensile Strength (MPa) |
~50–55 |
~40–50 |
~45–60 |
|
Elasticity (Elongation at Break) |
Low |
Medium |
Low |
|
Durability |
High |
High |
Medium |
|
Print Difficulty |
Moderate (requires enclosure) |
Moderate (requires enclosure) |
Easy (no enclosure required) |
|
Print Temperature (°C) |
~240–260 |
~210–250 |
~180–230 |
|
Bed Temperature (°C) |
~90–110 |
~50–100 |
~60–80 |
|
Impact Resistance |
High |
Medium-High |
Low-Medium |
|
Abrasion Resistance |
Good |
Moderate |
Poor |
|
UV Resistance |
Excellent |
Poor |
Poor |
|
Oxidation / Aging Resistance |
High |
Low |
Low |
|
Chemical / Corrosion Resistance |
Good |
Moderate |
Low |
|
Heat Deflection Temperature (°C) |
~90–100 |
~85–100 |
~60 |
|
Biocompatibility |
Limited |
No |
Yes (food-safe grades) |
|
Fumes / Toxicity |
Moderate (needs ventilation) |
High (needs ventilation due to fumes) |
Low (minimal fumes) |
|
Cost |
Medium-High |
Low-Medium |
Low |
In Brief
Each of the materials compared offers unique properties that make them more suited for specific applications:
● PLA is the easiest to print, making it a go-to choice for beginners, prototyping, and consumer products. It’s biodegradable and environmentally friendly but struggles with heat, UV exposure, and chemical resistance.
● ABS is a tough, impact-resistant material that performs well in functional parts and automotive applications. While it requires higher print temperatures and an enclosure, it excels in durability and is more suitable for parts that need strength and resilience.
● ASA stands out for its outdoor use capability, offering excellent UV resistance and high durability, making it the ideal choice for automotive parts or outdoor functional components. It has superior weather and chemical resistance compared to ABS, though it is more difficult to print than PLA.
If you want to learn more about the differences between ASA, ABS, PLA, and also PETG, please check out our detailed comparison here.
FDM: ASA 3D Printing Technology
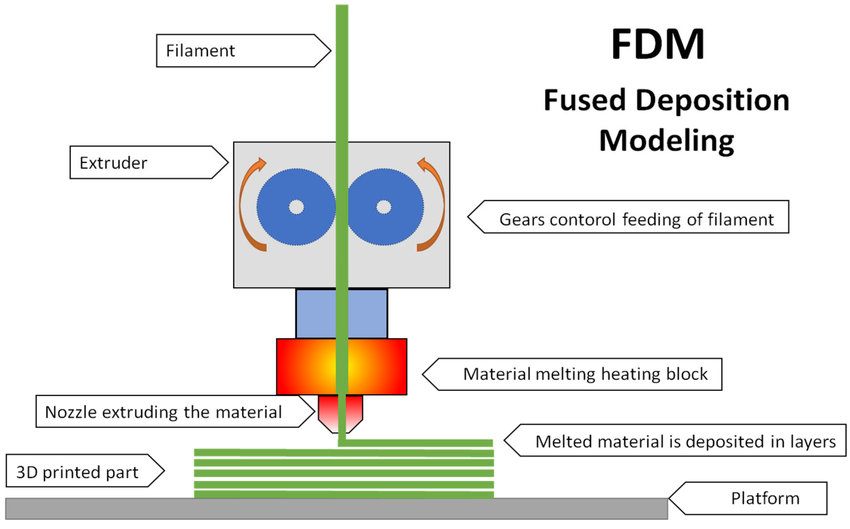
Source: researchgate.com
Fused Deposition Modeling (FDM) is a popular 3D printing method where thermoplastic filament is heated to its melting point and extruded layer by layer to build objects. It’s one of the most cost-effective ways to produce custom parts and prototypes.
FDM printers are widely available and offer fast production times, often completing projects in a single day. They are compatible with various thermoplastic materials, such as ASA, ABS, PLA, PETG, PC, and Nylon, making them ideal for both prototyping and some functional applications.
For ASA, the printing process follows similar steps to other thermoplastics:
1. Filament Feeding
The ASA filament is loaded into the printer’s extruder, where it’s pulled from the spool and directed toward the heated hotend.
2. Heating
The filament is heated to a temperature above its glass transition point (typically 240–260°C for ASA), ensuring it melts for smooth extrusion.
3. Extrusion and Deposition
Once molten, the ASA is extruded through the nozzle, deposited layer by layer onto the build plate, tracing the object design from the bottom up.
4. Layer-by-Layer Construction
Each deposited layer cools and solidifies, bonding to the previous one, allowing for high precision and the creation of complex shapes. To prevent warping, it’s important to maintain a stable print environment since ASA tends to shrink slightly as it cools.
How to Print ASA Successfully
When printing with ASA filament, achieving success depends on a well-controlled printing environment, the right hardware, and precise settings. These factors all play a key role in ensuring a smooth printing process and high-quality results with ASA 3D printing.
To fully harness the potential of ASA, specific hardware and setup adjustments are essential. The unique properties of ASA require particular attention to details that other materials may not need.
In the following sections, we’ll walk through the essential steps—from selecting the right hardware to setting up your printer, optimizing print settings, and perfecting post-processing techniques. By following these guidelines, you’ll be able to achieve consistent, high-quality ASA prints.
Hardware Requirements
ASA printing demands specific hardware capabilities to ensure stable performance and high-quality results. Since ASA is sensitive to temperature fluctuations, the printer must maintain a controlled environment throughout the printing process.
Below are the essential hardware requirements for successful ASA 3D printing:
|
Component |
Requirement |
Notes |
|---|---|---|
|
Heated Print Bed |
90–110 °C (required for consistent first-layer adhesion and minimizing warping) |
A heated bed is essential for ASA printing. |
|
Enclosed Build Chamber |
Highly recommended to reduce drafts and prevent layer separation. |
Helps maintain stable temperature and humidity levels during printing. |
|
All-Metal Hotend |
240–260 °C (required for high extrusion temperatures necessary for ASA) |
Ensures proper extrusion of ASA material without clogging or issues at higher temperatures. |
|
Rigid Frame & Stable Motion System |
Ensures precision and accuracy during long prints, maintaining good layer bonding. |
A stable frame prevents issues like vibrations that can affect print quality over time. |
|
Filament Dryer or Dry Box |
Keeps filament dry (ASA is hygroscopic and can absorb moisture, which leads to extrusion problems) |
Essential for ensuring high-quality prints by reducing moisture-related extrusion issues. |
Additional Considerations:
● Enclosure: While not strictly necessary, an enclosure is highly recommended for best results, particularly for larger prints.
● Feeding / Spooling: No specific requirements, but ensure smooth filament feeding to avoid clogs.
● Cooling: Use minimal or no part cooling fan, as rapid cooling can cause warping.
To meet these requirements, it’s important to choose a 3D printer that is capable of handling ASA’s unique printing needs. While there are many printers on the market, certain models are particularly well-suited for this material. Here are some popular FDM 3D printers commonly used for ASA printing:
Popular FDM 3D Printers Commonly Used for ASA Printing
|
Printer Model |
Build Volume (mm) |
Heated Bed |
Enclosure |
Notes |
|---|---|---|---|---|
|
Prusa i3 MK3S+ |
250 × 210 × 210 |
Yes |
Optional |
Reliable for desktop ASA prints of moderate size |
|
Ultimaker S3 / S5 |
230 × 190 × 200 / 330 × 240 × 300 |
Yes |
Optional |
High precision; user-friendly setup for ASA |
|
Raise3D Pro2 |
305 × 305 × 605 |
Yes |
Fully enclosed |
Industrial-grade machine ideal for large ASA parts |
|
BCN3D Sigma D25 |
420 × 300 × 200 |
Yes |
Fully enclosed |
Dual extrusion; supports soluble materials like HIPS |
|
Creality Ender 3 V2 / CR-10 |
220 × 220 × 250 / 300 × 300 × 400 |
Yes |
Optional |
Budget-friendly; may need a DIY enclosure for ASA |
Key Considerations for ASA Printing:
● Enclosed chambers help reduce warping and improve layer adhesion.
● Heated beds are essential for consistent adhesion and minimizing defects.
● Industrial-grade printers provide better temperature control and reliability for large or functional ASA parts.
By selecting suitable equipment and optimizing the environment, users can fully leverage ASA’s strength, durability, and weather resistance.
With these foundational requirements established, we can now move on to Hardware Setup, where we’ll discuss how to prepare your printer for optimal ASA performance before starting a print.
Hardware Setup
Before starting your ASA 3D print, setting up your hardware correctly is critical to ensuring high-quality results. Proper preparation helps minimize issues such as warping, poor adhesion, and print failures. Follow these essential setup steps:
1. Ensure Proper Bed Adhesion:
● Clean the print bed thoroughly to remove any dust or oil that could interfere with adhesion.
● Apply a suitable adhesive, such as a glue stick, hairspray, or ASA-specific adhesive sheets, to enhance adhesion and prevent warping.
● Level the print bed carefully, as improper leveling can result in inconsistent layer adhesion.
2. Check the Printer’s Hotend and Heated Bed:
● Make sure the hotend is set to the correct temperature for ASA (typically 240–260°C).
● Verify the heated bed is properly calibrated and set to the ideal temperature for ASA (90–110°C).
3. Use an Enclosed Build Chamber:
● If your printer has an enclosure, ensure it is securely closed. The enclosure helps maintain a stable printing environment, reducing the risk of warping and ensuring consistent layer bonding.
● If you’re using a printer without an enclosure, consider creating a DIY enclosure with materials like acrylic or foam boards.
4. Filament Drying:
● ASA filament can absorb moisture from the air, which may cause bubbling or poor layer adhesion. Dry the filament using a filament dryer or place it in a dry box to ensure it is moisture-free before printing.
By ensuring these setup steps are followed, you’ll provide the best foundation for successful ASA printing.
Print Settings
Proper print settings are key to ensuring a successful print, especially when working with a material like ASA that requires higher temperatures and precise control. Adjust the settings in your slicing software based on the following parameters:
● Print Temperature (Hotend): Set the hotend temperature to 240-260°C. This allows for optimal extrusion and layer adhesion.
● Bed Temperature: A heated bed is essential when printing with ASA. Set the bed temperature to 90–110°C to ensure proper first-layer adhesion and reduce warping.
● Layer Height: For high-quality prints, use a layer height of 0.2mm or finer. If you’re printing functional parts, you may want to use a thicker layer height to increase strength.
● Print Speed: For best results, print at a moderate speed of 40–60mm/s to allow sufficient cooling and ensure good layer bonding.
● Cooling Fans: Reduce or turn off cooling fans during printing to prevent rapid cooling and warping. ASA benefits from slower cooling to allow layers to fuse properly.
● Retraction Settings: Adjust retraction settings to prevent stringing and oozing. A retraction distance of 4–6mm and a retraction speed of 20–30mm/s should suffice.
Additionally, using support materials such as HIPS (High Impact Polystyrene) can be useful for complex models, as they can be dissolved using limonene after printing.
Post-Processing
After completing your ASA print, several post-processing steps can improve the appearance, durability, and functionality of your parts:
1. Removal of Supports:
● If you’ve used HIPS or another support material, carefully remove the supports by dissolving them in limonene (for HIPS) or manually removing them with tools.
● If you used regular FDM supports, carefully break or cut the supports away.
2. Sanding and Smoothing:
● Sand your printed parts to remove any layer lines and create a smoother surface. Start with a coarse grit sandpaper (e.g., 120 grit) and work your way to finer grits (e.g., 600 grit) for a polished finish.
● For even smoother finishes, you can use a method like acetone vapor smoothing (though not effective with ASA, it works well with ABS).
3. Post-Curing:
● ASA is UV resistant but can still benefit from additional curing to improve strength and stability, especially for outdoor applications. This can be done by exposing the part to UV light for a set period of time.
4. Painting and Finishing:
● ASA’s UV resistance makes it ideal for outdoor applications, but if desired, you can paint ASA parts with plastic-compatible spray paints for added aesthetic appeal and extra weather protection.
By carefully following these post-processing steps, you can improve the quality and performance of your ASA prints.
To further assist you in mastering ASA printing, check out this helpful video that walks you through the entire process in action:
Challenges and Solutions
While ASA is a great material for durable and weather-resistant prints, there are several challenges you may encounter during the printing process. Here are some common issues and practical solutions:
● Warping: ASA is prone to warping due to its high printing temperature. To reduce warping:
-
Ensure your heated bed is properly calibrated and maintain a consistent bed temperature.
-
Use an enclosure to reduce drafts and temperature fluctuations.
-
Apply an adhesive to the print bed to improve adhesion.
● Layer Separation: This can happen if the ASA prints too quickly or the temperature is too low. To solve this issue:
-
Lower print speed slightly.
-
Ensure your hotend and bed temperatures are within the recommended range.
-
Use slower cooling rates (or turn off cooling fans) to allow proper bonding between layers.
● Stringing and Oozing: This issue is often caused by excessive extrusion or improper retraction settings. To reduce stringing:
-
Adjust your retraction settings in the slicer software (increase retraction distance and speed).
-
Ensure the hotend temperature is not too high, which can cause over-extrusion.
● Moisture Absorption: ASA filament can absorb moisture from the air, which leads to poor extrusion and bubbling. To prevent this:
-
Always store your ASA filament in a dry place or use a filament dryer.
-
Dry the filament before use if you suspect moisture absorption.
By being aware of these challenges and applying the appropriate solutions, you can ensure a smoother and more successful ASA printing experience.
ASA Printing Safety & Ventilation
When printing with ASA filament, safety should always be a top priority. ASA, like many other thermoplastics, can release potentially harmful fumes during the printing process, especially at high temperatures. Proper ventilation and safety precautions are essential to protect both the user and the workspace.
1. Fume Emission and Ventilation
ASA produces fumes when heated, which may contain volatile organic compounds (VOCs) and other potentially harmful gases. Extended exposure to these fumes can cause respiratory issues, headaches, and irritation to the eyes and throat. Therefore, it’s critical to ensure proper ventilation when printing with ASA.
● Enclosed Print Area: Seal the printer’s enclosure and use an activated carbon filter to trap fumes.
●